How to Change a Diaper: Step-by-Step Guide
Learning how to change a diaper correctly prevents rashes, stops leaks, and keeps your baby comfortable. Follow this complete step-by-step guide for a perfect change every time.
How to Change a Diaper: The Complete Step-by-Step Guide for New Parents
Learning how to change a diaper correctly is one of the most essential skills a new parent needs. Most people assume diaper changing is simple. However, the wrong technique causes rashes, blowouts, and leaks — none of which are necessary. This guide gives you a complete, step-by-step routine so that every change is clean, fast, and safe. Additionally, mastering how to change a diaper correctly makes every other part of diapering significantly easier. Before reading this guide, check our complete reference ↑ How to Choose Diapers: The Complete Guide [PILLAR LINK] for the full context on diaper types, sizing, and skin safety.

Alt text: how to change a diaper — organised diaper changing station with clean diaper, wipes, barrier cream, and disposal bag arranged within arm’s reach on a changing mat
How to Change a Diaper: Set Up Before You Start
The most important rule of diaper changing is this: never leave your baby unattended on an elevated surface — not even for one second. Therefore, gather everything you need before placing the baby down. A missing wipe or forgotten cream means you must reach away from the baby mid-change. That is when accidents happen.
What You Need Within Arm’s Reach
Before every single change, confirm you have these four items ready:
A clean diaper in the correct size. Fragrance-free, alcohol-free baby wipes. Zinc oxide barrier cream. A disposal bag or diaper pail within reach.
Additionally, if your baby is a newborn, make sure the clean diaper has a U-shaped umbilical cord cutout at the front. This prevents rubbing against the cord stump during the first two to three weeks of life.

Alt text: how to change a diaper preparation — clean diaper, fragrance-free wipes, zinc oxide cream, and disposal bag laid out in order on a clean white changing mat
How to Change a Diaper Step by Step
Follow this five-step routine at every single change. Consistency is the key. Furthermore, the more you repeat this sequence, the faster and more natural it becomes — most experienced parents complete a full change in under ninety seconds.
Step 1 — Open and Lift
Unfasten both diaper tabs. Hold your baby gently by both ankles and lift the bottom just high enough to slide the dirty diaper out from underneath. Fold the soiled diaper in half with the dirty side facing inward. Tuck it to the side — do not throw it away yet. It will catch any surprise spray while you clean.
Step 2 — Wipe Front to Back
Use a fresh wipe to clean the entire diaper area thoroughly. Always wipe from front to back. This direction is critically important for baby girls. Moving faecal bacteria toward the urinary opening causes urinary tract infections. Therefore, never wipe back to front — not even once.
Clean all skin folds and creases carefully. Use a second wipe if needed. As a result, you remove all residue before the new diaper goes on.
Step 3 — Air Dry the Skin
Allow the skin to air dry for at least fifteen to twenty seconds before applying the new diaper. This short pause dramatically reduces the risk of diaper rash. In fact, this step is one of the most consistently overlooked parts of how to change a diaper correctly.
If you see any pinkness or irritation, apply a thin, even layer of zinc oxide barrier cream now. Spread it gently — do not rub it in. The cream should sit on top of the skin as a protective layer, not be absorbed into it.
Step 4 — Slide the Clean Diaper Under
Lift the baby by both ankles again and slide the fresh diaper underneath. Align the back panel at waist height. The coloured wetness indicator strip should face outward on the front of the diaper. For newborns, make sure the front cutout sits below the umbilical cord stump.
Step 5 — Fasten and Check the Fit
Pull the front panel up to the belly button. Fasten both tabs evenly and symmetrically. Use the two-finger rule: you should be able to slide two fingers comfortably under the fastened waistband. If the fit is too tight, the diaper is too small. Size up immediately.
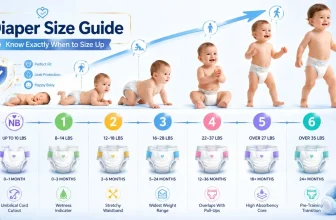
For the complete sizing guide and when to move up, see Diaper Size Guide: When and How to Size Up.

Alt text: how to change a diaper step by step — five-panel illustrated guide showing opening tabs, lifting baby, wiping front to back, applying barrier cream, and fastening the clean diaper
The Crucial Leg Ruffle Check After Every Diaper Change
After fastening the diaper, run your finger around both leg openings. This step takes three seconds. However, skipping it is the number one cause of diaper blowouts.
Why Tucked Cuffs Cause Blowouts
Every diaper has small ruffled elastic cuffs around the leg openings. These ruffles must face outward — away from the baby’s body — like a small skirt or frill around each leg. Outward cuffs create a physical seal that contains runny stool and prevents it from leaking out of the leg opening.
If the cuffs are tucked inward against the baby’s thighs, there is no seal. Consequently, any runny bowel movement will leak straight out onto clothing and bedding. This single check, done correctly after every change, eliminates the majority of blowout problems entirely.
Additionally, pull the back waistband up high on the lower back before fastening. A low-sitting back panel is the most common cause of back leaks, especially overnight when babies roll around during sleep.
For the complete guide to preventing nighttime leaks, see Nighttime Diapering Routine for Better Sleep.
Pros and Cons of Mastering the Correct Diaper Change Technique
The Good:
Prevents diaper rash by keeping skin clean and dry at every change.
Stops blowouts by ensuring the leg cuffs are correctly positioned.
Reduces infection risk by maintaining the front-to-back wipe direction.
Builds a fast routine — experienced parents complete a change in under two minutes.
Protects your clothing and bedding by preventing leaks at every change.
The Bad:
Takes practice to master — the first twenty changes feel slow and uncertain.
Requires all supplies to be pre-staged before every change, which takes planning.
Middle-of-the-night changes are difficult to do perfectly when exhausted.
For the complete overview of diaper types, brands, and skin safety, return to ↑ How to Choose Diapers: The Complete Guide [PILLAR LINK].
How to Change a Diaper: Frequently Asked Questions
How tight should the diaper tabs be when you change a diaper?
Snug but comfortable. After fastening, slide two fingers under the waistband. If they fit with slight resistance, the fit is perfect. If you cannot fit two fingers, the diaper is too tight. If you can fit your whole hand, it is too loose and will leak.
[H3] Should you change a diaper after every pee?
Not necessarily. Modern diapers can hold multiple small voids while keeping the skin surface dry. However, change immediately after every bowel movement. Additionally, if the wetness indicator has fully changed colour or the diaper feels heavy and saggy, it is time for a fresh one, regardless of how recently the last change was.
Is it normal for a newborn to pee during a diaper change?
Yes, very common. Newborns — especially boys — often urinate the moment the cold air hits them. Therefore, always keep a clean wipe draped loosely over the front during a change until the new diaper is ready. This prevents surprise sprays onto clothing, walls, and your face.
How do I change a diaper when my toddler refuses to lie down?
Use pull-up pants instead of tape diapers. Pull-up pants can be changed while your toddler stands up. Additionally, tear-away sides allow you to remove a soiled pull-up without pulling it down the legs. For the top-rated pull-up options, see Best Pull-Up Pants for Toddlers [INTERNAL LINK C05].
For the complete parent reference covering all diaper types, brands, skin types, and sizing, return to ↑ How to Choose Diapers: The Complete Guide [PILLAR LINK].